Adobe Acrobat Pro (not Acrobat Reader) for Windows
If at all possible, create a document that is not a PDF. Making a web page accessible to people with disabilities is far easier than making a PDF accessible. Microsoft Word documents are easier to make accessible than PDFs.
PDFs are found everywhere. They are Portable Document Format files, which means just about any computer can open them. Many people link to PDFs on a website, and many times PDFs have accessibility issues. If you really need to create a PDF, there are ways to make it more accessible to people with disabilities. On this page there are some basic steps to make a PDF from a Word document accessible, but for complete information consult the Adobe website.
Start With An Accessible Word Document
First, create an accessible Word document. Some accessibility will carry over from Word to PDF. Ensure that your Word document is accessible. What NOT to do: Don't go to File > Print and then choose Adobe PDF as the printer. This will not pass any accessibility information on to the PDF file. The best way to make an accessible PDF from a Word document is to use the Acrobat ribbon that is installed when you install Acrobat Pro. Choose the Acrobat tab, then Create PDF.
In the following dialog box, select the Options button:
Make sure the box is checked for Enable Accessibility and Reflow with tagged Adobe PDF:
Select OK, then Save.
Make your PDF Accessible in Adobe Acrobat Pro
These actions can be performed on any PDF.
Open your document in Acrobat Pro.
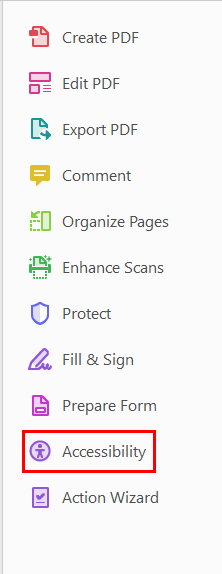
Under the Tools shortcut list (right sidebar), choose Accessibility.

If you don't see Accessibility in the tool column, go to the Tools tab at the top left and choose Accessibility.
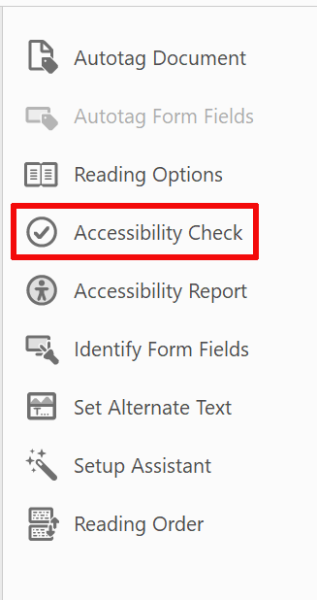
Choose Accessibility Check:

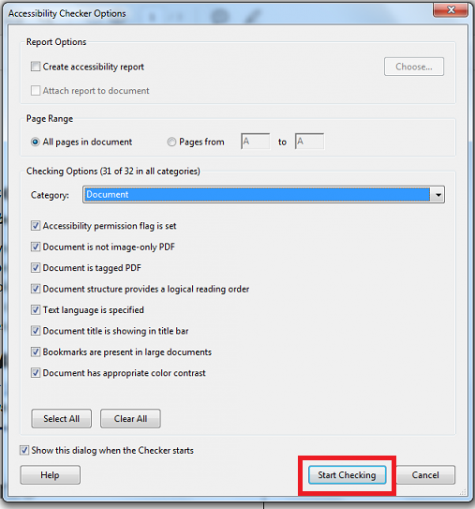
Choose Start Checking:

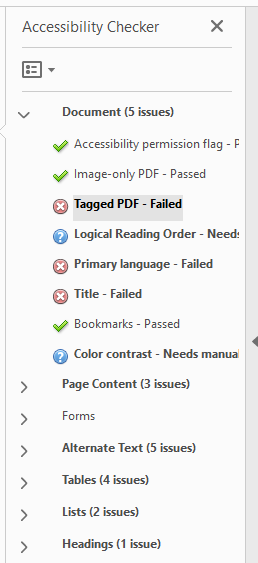
On the left, you will find the Accessibility Checker with issues in bold. You may need to expand some items to find all the issues.

The red circles with white Xs are issues that need to be fixed. Right click on it and choose Fix if possible. Otherwise, choose Explain.
The green checkmarks mean there are no issues with that item.
The question marks indicate that you need to do a manual check of the issue in question- it cannot be checked for accessibility automatically. In this instance the first manual check needed is Logical Reading Order.
Check Logical Reading Order
On the left sidebar in Acrobat Pro, choose the Tags icon. (If you don't see the Tags icon, select the View menu and under Show/hide > Navigation Panes, select Tags).
Expand the Tags tree
Select the Options icon and ensure "Highlight Content" is selected.
Select each tag in the panel and make sure the tag order matches the order in the main document window. When you select a tag on the left, the item in the main document window to the right will be highlighted. Select the first tag in your list and ensure it matches the first item in your document. Using your down arrow, move through the list of Tags while seeing if the highlighted elements follow the logical reading order of the document. If the tags don't match the logical reading order, you can drag the tags around in the panel on the left.
Color Contrast
The other “Manual check” in this example that is needed is Color Contrast. If you have black text on a white background your color contrast is good, and you can mark that item as “Passed”. If you want to use another high contrast color combination:
- Choose Edit > Preferences (Windows) or Acrobat: Preferences (Mac OS).
- Click Accessibility.
- Select Replace Document Colors, and then select Use High-Contrast Colors. Choose the color combination that you want from the drop-down list, and then click OK.
Again, for complete information consult the Adobe website.


